Why Aluminum Profile Dominates DIY Sim Racing
Aluminum extrusion, commonly called aluminum profile or eighty-twenty, has become the standard material for DIY sim racing cockpits. Unlike pre-built options with fixed dimensions, profile rigs offer infinite adjustability. You can modify pedal angles, seat positions, and wheel height precisely to match your body dimensions and driving preferences. This adaptability proves essential because ergonomic positioning significantly affects both comfort and lap times.
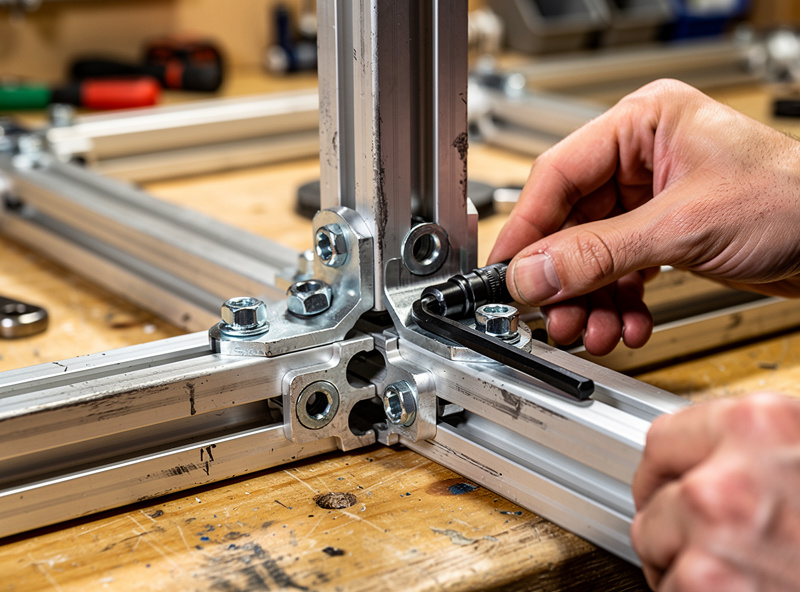
Profile systems use standardized slots that accept specialized nuts and bolts. These connections create rigid joints that handle the substantial forces generated by direct drive wheels and load cell pedals. A properly built profile rig exhibits no flex or movement regardless of how aggressively you drive.
Beyond adjustability, aluminum profile enables future expansion. You can add accessories like button box mounts, shifter brackets, or monitor stands without drilling or permanent modifications. As your equipment evolves, your cockpit adapts rather than requiring replacement.
Cost represents another advantage. DIY profile builds typically cost between three hundred and six hundred dollars, depending on size and accessories. Pre-built aluminum rigs from manufacturers like Sim-Lab or GT Omega range from five hundred to fifteen hundred dollars. Either option provides superior value compared to wood or steel alternatives that lack adjustability.
Aluminum profile also offers professional appearance and durability. Unlike wooden rigs that can warp, crack, or degrade over time, aluminum maintains its structural integrity indefinitely. The industrial aesthetic appeals to enthusiasts who view their cockpit as both functional equipment and a display piece. Many builders take pride in creating custom rigs that reflect their personal preferences while performing better than mass-produced alternatives.
Planning Your Build: Measurements and Design
Successful profile builds begin with thorough planning. Rushing into purchases without proper design leads to costly mistakes and ill-fitting components. Before ordering materials, gather critical measurements and create detailed sketches.
Body Measurements: Sit in a chair with approximately the seat height you plan to use. Measure your seated eye height, elbow height, and leg extension length. These dimensions determine wheel upright height, pedal deck angle, and seat positioning. Consider your typical racing posture, which often differs from normal sitting. Most sim racers prefer lower, more reclined positions than office chairs provide.
Equipment Specifications: Gather dimensions for your specific wheel base, pedals, and any planned upgrades. Note mounting hole patterns, depth requirements, and weight distributions. Direct drive wheels require more substantial uprights than belt-driven alternatives. Load cell pedals exert significant rearward force that your pedal deck must resist without flexing.
Space Constraints: Measure your available floor space, ceiling height, and access routes for moving the completed rig. Remember that you need clearance for swinging your legs over the side when entering and exiting. Plan for monitor or VR placement, ensuring adequate viewing distance and angles.
Sketching Your Design: Create detailed drawings showing profile lengths, connection points, and accessory mounting locations. Many builders use CAD software or online rig configurators to visualize their designs. Others work with pencil and paper, calculating lengths and angles manually. Either approach works if you verify measurements carefully before ordering.
Tools and Materials Needed
Building a profile rig requires specific tools and components. While specialized tools make assembly easier, you can complete a basic build with common workshop equipment.
Essential Tools: You need a metric tape measure, marking pen, and miter saw with aluminum cutting blade for cutting profile to length. Alternatively, many suppliers offer custom cutting services for small fees. An Allen key set, typically four and five millimeter, tightens the connections. A rubber mallet helps seat connections fully without damaging profile surfaces. Cordless drill with step bit creates holes for pedal plates or seat mounts.
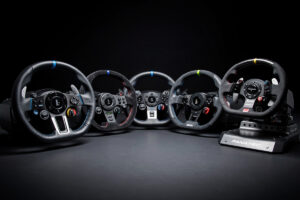
Profile Types: Sim racing rigs primarily use forty by forty millimeter or forty by eighty millimeter profile from the eight-series system. The “eight-series” refers to the slot dimensions, ensuring compatibility across manufacturers. Heavier drivers or those using powerful direct drive wheels should consider forty by eighty profile for the wheel upright section. Standard forty by forty suffices for base frames and pedal supports.
Connecting Hardware: Hammerhead T-nuts slide into profile slots before inserting bolts. These provide strong connections that resist loosening under vibration. Corner brackets reinforce joint rigidity at frame corners. Angle brackets mount pedals, shifters, and accessories. End caps cover exposed profile ends for safety and appearance.

Designing Your Frame Layout
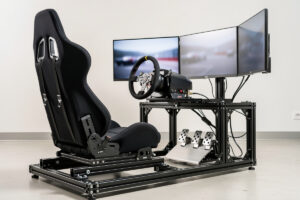
Before purchasing materials, sketch your frame design considering your body dimensions, equipment specifications, and available space. Standard single-seater cockpits typically measure approximately four feet in length and two feet in width, though dimensions vary based on seating choice.
Wheel Upright: Vertical sections supporting the wheel base require height positioning your wheel rim approximately twelve inches above your seated elbow height. This positioning mimics real car ergonomics and prevents shoulder strain during long sessions. The upright needs sufficient rigidity to resist direct drive torque without flexing toward or away from you.
Pedal Deck: Pedal mounting surfaces angle between thirty and forty-five degrees depending on your preference. Steeper angles allow more aggressive heel-toe techniques, while shallower angles reduce ankle strain during sustained braking. The deck requires reinforcement to prevent flexing under load cell brake pressure, potentially using additional profile sections or steel pedal plates.
Seat Mounting: You have several seat options. Real automotive seats from junkyards or salvage yards offer authenticity and comfort at low cost, though they require fabricating mounting brackets. Sim racing specific seats from companies like GT Omega or Sim-Lab include mounting holes compatible with profile. Office chairs work temporarily but lack the reclined position ideal for racing.
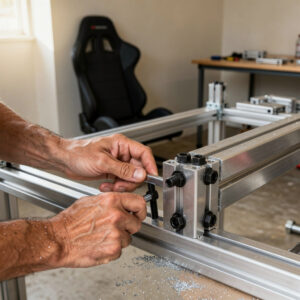
Step-by-Step Construction
Once you have materials and design, assembly proceeds logically from base to uprights to accessories.
Step One: Base Frame Assemble the rectangular base using four pieces of forty by forty profile cut to your desired length and width. Connect corners using corner brackets for rigidity. This base must sit flat on your floor without rocking.
Step Two: Wheel Upright Attach vertical profile pieces to the rear corners of your base. These uprights should extend approximately three feet above the base surface, though exact height depends on your seating position and wheel type. Connect the tops using a horizontal piece that will support your wheel base.
Step Three: Cross Bracing Add diagonal profile pieces between the uprights and base frame. These braces prevent the uprights from flexing toward you during heavy braking or cornering forces. Without bracing, even strong direct drive wheelbases feel vague and disconnected.
Step Four: Pedal Deck Mount angled profile pieces at the front of your base to create the pedal mounting surface. These pieces should angle upward from floor level toward your seated position. Attach your pedal plate to these angled pieces using bolts through slotted holes that allow fore-aft adjustment.
Step Five: Seat Mount Install horizontal profile pieces across the base frame to support your seat. Depending on seat type, you might mount directly to profile or create a subframe using steel angle iron for automotive seat rails.
Learn more about configuring your complete setup in our guide to optimizing force feedback settings once your rig is assembled.
Adjusting Ergonomics for Comfort and Performance
Proper positioning affects both lap times and physical health. Spend time adjusting these critical dimensions before racing seriously.
Seat Position: Your hips should sit lower than your knees, replicating sports car posture rather than upright sedan seating. This positioning keeps your center of gravity low and provides leverage for steering inputs. The seat back should recline between ten and thirty degrees from vertical. More recline benefits open-wheel racing positions, while upright positions suit GT racing.
Pedal Distance: With pedals fully released, your legs should maintain slight bend at the knees, never fully extended. Fully straight legs cannot provide smooth modulation and create pressure points behind the knees during long sessions. Adjust pedal plates forward or backward until you find positions allowing full pedal travel with comfortable knee bend.
Wheel Reach: With arms extended, your wrists should rest on the top of the wheel rim. This positioning allows full lock-to-lock rotation without stretching or crowding. Your shoulders should remain against the seat back during all steering inputs.
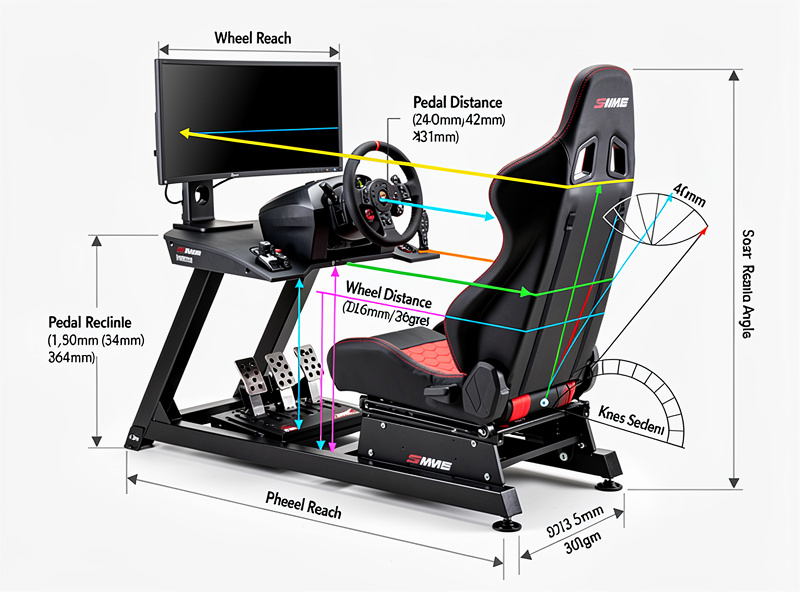
Screen Positioning: Position single monitors as close as possible behind your wheel rim, typically between twenty-four and thirty-six inches from your eyes. Triple screens wrap around your central position. Calculate mathematically correct field of view using our FOV Calculator tool to ensure proper visual perspective.
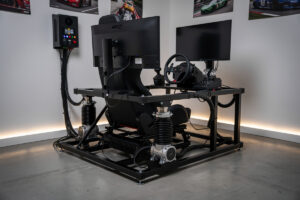
Cable Management and Accessories
Professional-looking rigs hide cables and include thoughtful accessories that enhance daily use.
Cable Routing: Profile slots accommodate cables neatly. Run wheel base USB and power cables through upright profile sections, emerging near your PC or power outlet. Secure cables using cable ties anchored to profile slots. For pedal cables, route underneath the pedal deck to prevent accidental kicks or snagging.
Button Box Mounts: Attach small profile pieces at convenient locations for mounting button boxes or switch panels. Position these within thumb reach while maintaining steering grip. Popular mounting locations include the wheel upright sides or the front edge of the pedal deck.
Shifter and Handbrake Mounts: Add profile extensions to the right side of your seating position for H-pattern or sequential shifters. Position shifters at heights matching real cars you simulate. Rally drivers might add left-side handbrake mounts using angled profile pieces.
Once your rig construction is complete, explore our guide to DIY sim racing upgrades for adding transducers, button boxes, and other enhancements that transform a basic rig into an immersive racing environment.
Testing and Refinement
Your first assembly represents starting points, not final configuration. Expect several adjustment sessions before finding your optimal positions.
Drive for thirty minutes, noting any discomfort or control difficulties. If your shoulders tire, recline the seat further and adjust wheel reach. If your legs cramp, adjust pedal distance or angle. If the wheel feels vague during heavy cornering, check that upright cross bracing is tight and sufficient.
Document your final dimensions once you find comfortable positions. This documentation proves invaluable if you disassemble the rig for moving or if friends want to replicate your successful design.
A well-built aluminum profile rig serves you for years, adapting as your equipment and preferences evolve. The initial effort of DIY construction rewards you with personalized ergonomics, substantial cost savings, and the satisfaction of building something exactly matching your needs.
Frequently Asked Questions
How much does it cost to build a DIY sim racing rig?
A DIY aluminum profile rig costs $300-$600 depending on size and accessories, compared to $500-$1500 for pre-built options. The main cost is aluminum extrusion ($150-$300), connecting hardware ($50-$100), and a seat ($50-$200 for used automotive seats or $150-$400 for sim racing seats.
What aluminum profile size should I use for a sim rig?
Use 40x40mm profile for the base frame and general structure. Use 40x80mm profile for wheel uprights and pedal decks that experience high forces from direct drive wheels and load cell pedals. All 8-series profile from any manufacturer is cross-compatible.
Do I need tools to build an aluminum profile rig?
You need a metric tape measure, miter saw with aluminum cutting blade, Allen key set (4mm and 5mm), and a rubber mallet. Many suppliers offer custom cutting services for small fees, eliminating the need for a saw. Assembly takes 4-8 hours for first-time builders.
Can I mount a direct drive wheel on a DIY rig?
Yes, aluminum profile rigs handle direct drive torque without flex when properly constructed. Use 40x80mm profile for wheel uprights and add diagonal cross bracing between uprights and base frame. This prevents flex during aggressive cornering that would diminish force feedback clarity.
What seat works best for a DIY sim rig?
Used automotive seats from salvage yards offer authentic ergonomics at $50-$150. Sim racing seats from GT Omega or Sim-Lab include profile-compatible mounting holes for $200-$400. Avoid office chairs as they lack the reclined position ideal for racing posture.
How long does it take to build a DIY sim racing rig?
First-time builders typically spend 4-8 hours on assembly after planning and cutting. Planning and design takes another 2-4 hours. Total project time including research, ordering materials, and construction is typically 2-3 weekends. Experienced builders complete rigs in a single day.
Is a DIY rig better than a pre-built sim racing cockpit?
DIY rigs offer better value ($300-$600 vs $500-$1500), infinite adjustability, and expansion possibilities that pre-built rigs lack. Pre-built options save time and include engineering optimization. Choose DIY if you enjoy building and want customization; choose pre-built if you value convenience.
Related Articles
- What Is Sim Racing? — Introduction to the complete hardware ecosystem
- How to Plan Your First Sim Racing Setup — Budget framework and equipment prioritization
- DIY Sim Racing Upgrades — Button boxes, transducers, and accessories for your rig
- How to Configure Force Feedback — Optimizing settings for direct drive on rigid mounts
- Setting Up a Sim Racing Space — Ergonomics and cable management for your cockpit